How to Patch a Tire
When flat tires occur in our riding lawn mowers, tractors, trailers, ATVs/UTVs, dirt bikes, wheelbarrows and other non-highway tires, we always reach for our trusted Slime tire sealant (stops flats for 2 years!). But some gashes and slashes are too large for sealant to seal, so you need to patch your tire instead.
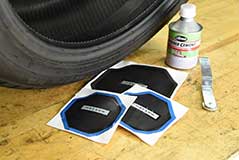
Patching a tire is easy, and with the right tools, can quickly get your tire back in working order. There are many patch kits out there that include all the pieces you need to successfully patch a tire, or if you already have some of the items below on hand, you can supplement with the individual supplies as needed. Let’s get started:
- Tire marker
- Scuffer
- Tire patch of the appropriate size
- Rubber cement
- Buffer tool for stitching
Step 1: Use your tire marker to mark the spot that you want to patch.

Step 2: Use the scuffer tool to rough up the offending area with a crosshatch pattern. Don’t be shy with the tool. The patch adheres better to a rough surface. Make sure area within 1/2" (1.25 cm) of puncture has roughened appearance. Wipe away any loose rubber pieces that formed during the scuffing.

Step 3: Apply rubber cement directly to the roughened surface of your tire and spread evenly. Work into material and wait until tacky. You can also apply rubber cement to the patch instead (provided you first remove the backing of the patch – see Step 4).

Step 4: Remove the backing from your patch without touching the exposed surface. If the patch comes with a thin plastic film on top, do not remove. Position the patch correctly over the puncture location. Radial patches can go in any position on the radial tire. Bias tires require that patches are specifically aligned with the bead. Look for arrows that indicate how you should align the patch with the bead of the tire.
 |
 |
 |
 |
 |
Step 5: Press the patch firmly over the puncture area, being sure to press down the edges. Use the buffer tool to stitch the patch down and force out any trapped air. After ensuring the edges of the patch are firmly attached, then remove the clear plastic backing from the patch.

Step 6: Wait for the patch to completely dry, then remount the tire and air up. Congratulations, you have successfully patched a tire!

Please note: This blog is specifically about patching a non-highway tubeless tire. Please take all automotive highway tires to a professional repair shop for a U.S. Tire Manufacturers Association approved tire plug or patch. If you are looking for instructions on how to patch a tube, click here.